Tuesday, June 18, 2013

Cabin Ideas

When you are in the planning and design stage of any building project such as we are with our cabin, it is always a fun activity to gather various sources of inspiration. These sources of inspiration can help if you are designing the home or cabin from the ground up or if you have blueprints and are simply looking for a few ideas for decorating. If you are working with a designer or contractor it is always nice to have some visuals to show the professional what style you favor.

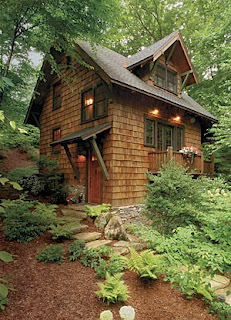
Here are a few exterior cabin images that I am smitten with:


We will be designing the cabin ourselves and have decided upon an A - frame style with a loft. We want something with a small footprint that blends with our surroundings not detracts from the rustic and remote nature of the land.

This Spring we built the bridge, and cleared the land where the cabin is going to be built. The plan is to start the building phase this fall and fingers crossed - being roof tight winter.


Thursday, June 13, 2013

Spending a Little Time With Thompson's

Hi there! It has been raining a lot here in Nova Scotia this past week but I was still able to get a bit of gardening in. Since spring has sprung and as the temperatures creep up, I have been itching to get my hands dirty and plant stuff!

As perimeters for our garden beds we use wood 4 x 4's. I would love to replace them with stone but it is simply not in the budget right now. To help preserve the wood and make it look more attractive, I apply a stain to the wood once a year in the spring.

We like Thompson's Water Seal in Honey Gold. I am a fan of this stain for three reasons: its inexpensive, you can pick it up off the shelf at your local home improvement store and it is really east to apply.


Because I only do this chore once a year and its not easy stuff to clean up, I make a stain holder out of an empty water jug. It has a sturdy handle so it is easy to carry and hold and is readily available in our house since we buy our water. It also easy to dip and wipe the access the stain off the brush. I also use these for paint holders around the house.


I simply cut a hole along the smooth plastic of the jug keeping the handle intact. Dispose of the cut portion and fill the container with stain. When finished staining, I toss the brush and container in the trash.


So, after the beds are weeded and fresh mulch is applied, I bring out the stain and apply it liberally to the wood with an inexpensive stain brush.

Here are a few before and after images of the wooden garden perimeters.


before
 

after
 

before
 

after
 

before
 

after
 
Notice the water beading on the wood in the above after picture? Before I applied the stain the water soaked right into the wood. Not anymore!

There is certainly a bit of sweat involved in applying the stain since we have 10 beds now and counting, but I appreciate the peace of mind knowing that the wood is protected for another year, and its one more item we can mark off our to do list!

Have you been staining any wood around your home lately?


Tuesday, June 11, 2013

Feeling Blue

Hi friends! Hope your week is going well so far. We hosted a dinner party on Sunday for Mr. RSH's birthday and  I am still recovering from the food coma. It was a great evening with wonderful company and conversation. Did I mention Carrot Cake?!

I have been really drawn to rooms with blue and white color palettes lately. This is a bit odd because although I like the color blue, I am very particular about which ones. I have always preferred mid to dark toned blues such as Admiral Blue by Benjamin Moore or Warm Spring by Behr.

Now seeing how beautifully these designers executed the designs in these spaces, with various shades of blue - I'm converted. All shades of blue are welcome in my home!


In this space the blue is used almost as an accent in the space against a light and airy backdrop of white walls and light toned woods.


Adding a pop of color such as the yellow used in this room, keeps the space light and fresh. The yellow adds a bit of the unexpected amongst the blue.


By layering different shades of blue in a room, you achieve a very sophisticated look with minimal effort. Blue and wood tones together lend a very classic look to a space.


If you want to keep the room light as in this space you can achieve it by using lots of cream and white. Also installing beautiful garden doors with transoms wouldn't hurt either!
 
What color combos are you crushing on lately?


Friday, June 7, 2013

Moss Spring Wreath

Each season I like to add a bit of adornment to our front exterior entry. Usually this consists of a wreath, some plants and a new area mat.

This year I decided to make a moss wreath for spring and summer. I like the rustic and natural look of the moss. Last year I made a similar wreath out of fake moss that I bought at Michael's. I priced it again this year and it was way out of my budget so I thought why not collect the some real stuff ourselves - for free!


So, last weekend when we were out at the cabin, we gathered some moss and brought it home. Because we had been getting so much rain, the moss was soaked with water so I spread it out on the deck when the weather was better and let the sun do its thing.

The supplies I used for this wreath are:

Spray adhesive (note: last year I used a glue gun and found the synthetic moss didn't hold very well.)
Straw wreath form
Ribbon
Small nest with eggs
Small bird figurine


Because the moss was from the woods it had a bit of debris in it that I didn't want to include in my wreath such as leaves and twigs so I removed them from the moss.


Then I sprayed a section of moss and the equivalent size area on the wreath form. I the applied the moss to the wreath and held it there for a few seconds. I kept doing this until the wreath was covered with moss. Keep in mind the spray adhesive is quite strong smelling so I suggest doing this project in a well ventilated area or outside.


I then added the ribbon and the small figurines. Although the bird had a metal clip to aide with attaching it to the wreath, I still added a bit of spray adhesive to the base of it along with the nest to ensure it would stay in place. I then used scissors to trim the wreath up a bit because the moss was a little out of control.


Here is the finished project.


I am very pleased with the end result. I like how it adds a bit of seasonal interest to our front entry and best of all it was free! I simply used materials from last years wreath that I had purchased at Michael's.


Have you completed or are working on any seasonal crafts or upgrades this Spring and Summer?


Tuesday, June 4, 2013

Family Time

Hi friends! I hope you had a great weekend. We had the most wonderful weather in Nova Scotia this weekend, and our family certainly took advantage of it!


We mowed our lawn, weeded the garden beds, and I stained the wooden perimeters of the garden beds. I do this every year to help protect them from the elements but I am afraid we will have to start replacing the wood if not this year, certainly next. I'll blog more about that process later this week.

We went for a drive Saturday afternoon to Five Islands, NS and along the way stopped at a few antique shops and even an auction. It was Abigail's first auction and she was right at home. She found some Doctor Seuss books in a bin, grabbed "Green Eggs and Ham" and found the biggest oak tree on the property to read under its shade. It was really sweet.

On Sunday we decided to visit Clam Harbour beach for the afternoon and although it was windy and chilly compared to home, we still had a great time. We had never been before, so it was a nice new experience for the family to enjoy together. Abigail played in the sand, and we helped her collect "treasures" as she calls them, from the ocean.


It felt so nice to reconnect with the family since it is so easy to get caught up in the cycle of running one day to the next with our endless lists of to do's. Since I have been putting more focus on my interiors business, more early mornings and late nights! It is important to make the time to just be and reconnect.


Well that wraps up our weekend, how did you enjoy your weekend? Any fun plans for this week? I started my Spring cleaning, and that is going to take me all. week. long. - jealous aren't you?