Tuesday, June 14, 2011

Girly Office Makeover

I was contacted in April by a client who had moved into her home and desperately needed help decorating it.

The first room she wanted to tackle was her personal home office. The client wanted a room that she could work in, that had girly/ feminine feel, was organized and most importantly finished!

We had a tight budget but I really enjoyed the challenge of finding fabulous things on a dime, reusing items that my client already had in her home and because she was so hands on the client worked on DIY projects that really added to the space.

Here are the before pics of the room:


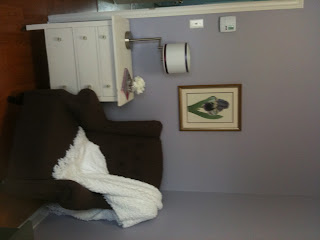
and the after pics:


The book case built-in and valance was custom made and installed by Mr.RSH. Wrapping the valance in fabric, the bulletin board and adding ribbon detail to the side table lamp were DIY projects completed by the client and her friend. Pillows for the wing back chair were sent away to be made however they were not completed when these pics were taken.

The side table was an item the client had bought at a yard sale and had intended to use in another room but it worked in this space so we used it! I has lots of surface room for her lamp, books and a glass of water if she so desires. The lamp was originally in another room in her house but it was perfect for her office so we used it there instead.

The desk is actually a vanity that the client really liked and although it doesn't have a lot of storage for big items, she has a closet in the room in which we added a shelf, several co-ordinating baskets and a filing cabinet for storing her bulkier things such as files and paper.

This office makeover shows that you can have a space that you want without spending a ton of cash. This room was finished a head of schedule and on budget. Where we spent a bit of dough on custom touches such as the bookcase, we saved by shopping the house and buying accessories and furniture at discount stores. You simply have to be willing to trade off, get your hands a little dirty, and use your creativity.

If you like what you see and have a space that you would like my help with please contact me, I'd love to help!

Friday, June 3, 2011

Painting/Staining 101

Hi Friends, I hope the sunshine has found you! Isn't Spring fab?

As you may know, last year we re-shingled the exterior of The Rustic School House and began staining it however, the colder weather set in before we could finish. Now that the warmer weather is back (yay!), I have whipped out the 'ol stain brush and started staining again.

I have hated painting/staining for a long time. I always had to tape everything off and I would still manage to get paint where it doesn't belong including all over me! When I started my decorating business last year, and as we were doing more sprucing up of The Rustic School House, I decided that there must be an easier way to paint. A way to enjoy myself while painting and not make a huge mess in the process- I mean there are many people that actually enjoy painting.


After much research and trial and error, I have compiled a list of tips to help you if you find yourself with the same aversion to painting as I had.

1. Get rid of the edger gizmo's and painters tape.


Using as steady of a hand as possible makes a better finish than any of those edger products. The edgers are great at first until the rollers get paint on them or you apply too much paint and you end up with paint bleed all over your ceiling. Any painters tape I have ever used I have had paint bleed. There is a new painters tape on the market called Frog Tape that is supposed to have paint blocking technology, however I have yet to use it.

2. Use the best tools you can afford.


I have used all kinds of paint brushes and rollers in the past and I have learned the mantra "you get what you pay for" definitely applies here. I use a 2.5" Purdy Paint brush and I love it. Purdy brushes are handcrafted and are pricier than other brushes but the quality is worth every penny. Wash your brush out thoroughly after each use and if you do so, your brushes should last a long time. When using a roller to apply paint on a large surface area such as a wall, the higher the quality roller refill you purchase the better because it will hold the paint, and help ensure a more even coverage. Along with a good quality refill, a good quality extension and cage(what the roller refill goes onto) is worth its weight in gold. An extension pole simply twists into the base of the roller cage and helps you get the higher areas such as the top half of a wall or the ceiling in a room.

3. Keep your eyes on where you are going, not where you've been.

When painting always look slightly ahead to where you are going to be applying paint next instead of behind or at your brush. I find this tip has helped me tremendously with cutting around trim and baseboards so I no longer have to tape everything off.

4. Make sure you have a lot of paint on your brush.

Dip your paint brush no higher than 1/2 on the bristles. Scrape a little bit of paint off as to not have an overload of paint on your brush, and keep the brush wet with paint throughout the entire painting process.

5. Cleaning up is always a pain.


Do a little bit of work before hand so that it minimizes the work you have to do later. Always gather all of your supplies that you will need to complete the task or project and this includes any materials to aide in the cleaning up process. I like to use paint tray liners so that if I am using several colors of paint or stain I can save time by dedicating one tray to each color and when I am finished I can either wash and reuse them or throw them out if necessary. Use latex based paints and stains so all you need to clean up with is soap and water. Make sure that your rollers and brushes are cleaned thoroughly so next time you are ready to paint you have all your tools ready and are in good, clean condition.

I hope that these few tips will help you with your next painting or staining project and if you have any tips of your own please share them with me! I'd love to hear 'em!