Today the weather is gloomy and damp - a perfect day to get in the kitchen and do some baking! I wanted to share my hands down favorite tea biscuit recipe with you - it never lets me down!
Tea Biscuits
2 cups flour
4 teaspoon salt
1/2 teaspoon cream of tartar
3 teaspoon sugar
1/2 cup shortening
Process the above ingredients in your food processor until coarse, then dump the mixture in a bowl and make a well in the center. Add 3/4 cup milk and stir together.
Remove from bowl and knead on a floured surface until smooth. Once kneaded roll out dough with your rolling pin to a 2" thickness and cut with biscuit cutter.
Place on pan and bake in 400* C oven for 10 minutes.
These are so good with a bit of butter and a cup of tea (or coffee)!
Have you done any baking lately? Do you prefer to cook or bake?
Kelly Day Interiors
Thursday, July 11, 2013
Tuesday, July 9, 2013
The Bridge at Long Lake
Hey friends and happy Tuesday! We are one day closer to the weekend!
It has been a while since I wrote about any progress at our cabin, so today I wanted to write a bit about what has been going on at Long Lake.
We have chosen the location on the property where we are going to build the cabin, and have cleared some of the land on the property. Since it is really busy on the home front right now with several projects on the go, items needing our attention we decided to wait until fall to get started on the building process with our fingers crossed that we will be roof tight by winter.
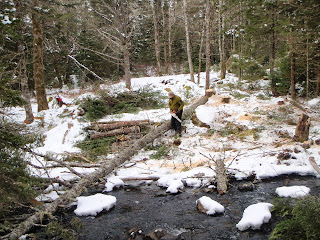
The land, where we will be building our cabin is across a brook, so our only access to the property is by boat, helicopter, rubber boots and balance or a bridge. Since we don't have any helicopters at our disposal and I have zero balance on a good day, we decided we would have to build a bridge. Nothing fancy - just a basic, walking bridge that allows us to get across the brook without a soaker and haul building materials across.
We started the bridge building process by using two telephone poles that were on the property brought out by another member of the family originally for use in another project. They fit the bill perfectly.
We used boulders that were in the brook and added a few cinder blocks as supports for the far end of the poles.
Once we had the poles as level as we could get them, we measured and cut lumber to length for the walking surface of the bridge. Using a chalk line, we kept the wood as straight as possible and spaced them approximately two inches apart.
Since the span for the bridge was over 80' the telephone poles were able to reach less than halfway. We then had to cut and fall two large trees to complete the rest of the bridge.
Because the trees were so heavy, there was no way we could lift them, so we wenched them into place using our Yamaha Rhino and a pulley system.
It was a very tiring job wenching and prying while standing and balancing on boulders and rough terrain. Because everything was planned in advance, and the proper equipment was being used, the whole process went quite smoothly.
MacGyver is exhausted from all the bridge building but clearly gives the bridge his seal of approval.
We built the bridge in such a way to not impede the flow of the brook, using rock, cinder block and raw wood for materials. If the bridge has to be removed in the future for whatever reason, we will be able to do so without any damage to the land.
It has been a while since I wrote about any progress at our cabin, so today I wanted to write a bit about what has been going on at Long Lake.
We have chosen the location on the property where we are going to build the cabin, and have cleared some of the land on the property. Since it is really busy on the home front right now with several projects on the go, items needing our attention we decided to wait until fall to get started on the building process with our fingers crossed that we will be roof tight by winter.
The land, where we will be building our cabin is across a brook, so our only access to the property is by boat, helicopter, rubber boots and balance or a bridge. Since we don't have any helicopters at our disposal and I have zero balance on a good day, we decided we would have to build a bridge. Nothing fancy - just a basic, walking bridge that allows us to get across the brook without a soaker and haul building materials across.
We started the bridge building process by using two telephone poles that were on the property brought out by another member of the family originally for use in another project. They fit the bill perfectly.
We used boulders that were in the brook and added a few cinder blocks as supports for the far end of the poles.
Once we had the poles as level as we could get them, we measured and cut lumber to length for the walking surface of the bridge. Using a chalk line, we kept the wood as straight as possible and spaced them approximately two inches apart.
Since the span for the bridge was over 80' the telephone poles were able to reach less than halfway. We then had to cut and fall two large trees to complete the rest of the bridge.
Because the trees were so heavy, there was no way we could lift them, so we wenched them into place using our Yamaha Rhino and a pulley system.
After the trees were limbed and wenched into place, the fellas leveled everything with blocks and wood.
It was a very tiring job wenching and prying while standing and balancing on boulders and rough terrain. Because everything was planned in advance, and the proper equipment was being used, the whole process went quite smoothly.
MacGyver is exhausted from all the bridge building but clearly gives the bridge his seal of approval.
We built the bridge in such a way to not impede the flow of the brook, using rock, cinder block and raw wood for materials. If the bridge has to be removed in the future for whatever reason, we will be able to do so without any damage to the land.
Monday, July 8, 2013
Noteable Quotables
"A pessimist sees the difficulty in every opportunity. An optimist sees the opportunity in every difficulty."
Winston Churchill
Winston Churchill
Friday, July 5, 2013
Potted Outdoor Herb Garden
Happy Friday friends! I hope you have some fun plans for the weekend with a bit of time to relax thrown in too!
Last weekend we made our weekly trip to our local Home Depot and while there I purchased three planters that were on sale for half price, some Miracle Grow potting soil that was also half price and three herb plants - cilantro, basil and oregano. Total cost including taxes $ 29.03.
I finally had the time last evening to plant them. I really enjoy cooking and I find fresh herbs really add flavor and depth to any dish. Nothing beats adding fresh herbs that you have grown into your soups, casseroles, salads, etc.
Last year I planted herbs indoors and they were an epic fail. Where I located them didn't get a lot of sun so they died. Lesson learned - herbs need lots of sun to survive!
I simply filled the pots with potting soil and loosened the root ball . I put the plant in the soil as close to center as possible, covered the base with soil and watered them.
The deck gets full sun so the herbs should thrive there wonderfully and I placed them in a location on the deck just off the kitchen for easy and quick access while I am cooking.
Have you planted any herbs this year? Did you put them in the ground or in a pot?
Tuesday, June 18, 2013
Cabin Ideas
When you are in the planning and design stage of any building project such as we are with our cabin, it is always a fun activity to gather various sources of inspiration. These sources of inspiration can help if you are designing the home or cabin from the ground up or if you have blueprints and are simply looking for a few ideas for decorating. If you are working with a designer or contractor it is always nice to have some visuals to show the professional what style you favor.
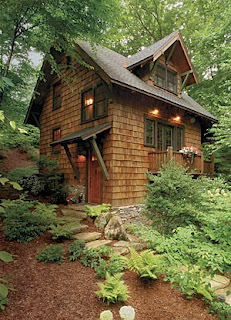
Here are a few exterior cabin images that I am smitten with:
We will be designing the cabin ourselves and have decided upon an A - frame style with a loft. We want something with a small footprint that blends with our surroundings not detracts from the rustic and remote nature of the land.
This Spring we built the bridge, and cleared the land where the cabin is going to be built. The plan is to start the building phase this fall and fingers crossed - being roof tight winter.
Here are a few exterior cabin images that I am smitten with:
We will be designing the cabin ourselves and have decided upon an A - frame style with a loft. We want something with a small footprint that blends with our surroundings not detracts from the rustic and remote nature of the land.
This Spring we built the bridge, and cleared the land where the cabin is going to be built. The plan is to start the building phase this fall and fingers crossed - being roof tight winter.
Monday, June 17, 2013
Thursday, June 13, 2013
Spending a Little Time With Thompson's
Hi there! It has been raining a lot here in Nova Scotia this past week but I was still able to get a bit of gardening in. Since spring has sprung and as the temperatures creep up, I have been itching to get my hands dirty and plant stuff!
As perimeters for our garden beds we use wood 4 x 4's. I would love to replace them with stone but it is simply not in the budget right now. To help preserve the wood and make it look more attractive, I apply a stain to the wood once a year in the spring.
We like Thompson's Water Seal in Honey Gold. I am a fan of this stain for three reasons: its inexpensive, you can pick it up off the shelf at your local home improvement store and it is really east to apply.
Because I only do this chore once a year and its not easy stuff to clean up, I make a stain holder out of an empty water jug. It has a sturdy handle so it is easy to carry and hold and is readily available in our house since we buy our water. It also easy to dip and wipe the access the stain off the brush. I also use these for paint holders around the house.
I simply cut a hole along the smooth plastic of the jug keeping the handle intact. Dispose of the cut portion and fill the container with stain. When finished staining, I toss the brush and container in the trash.
So, after the beds are weeded and fresh mulch is applied, I bring out the stain and apply it liberally to the wood with an inexpensive stain brush.
Here are a few before and after images of the wooden garden perimeters.
Notice the water beading on the wood in the above after picture? Before I applied the stain the water soaked right into the wood. Not anymore!
There is certainly a bit of sweat involved in applying the stain since we have 10 beds now and counting, but I appreciate the peace of mind knowing that the wood is protected for another year, and its one more item we can mark off our to do list!
Have you been staining any wood around your home lately?
As perimeters for our garden beds we use wood 4 x 4's. I would love to replace them with stone but it is simply not in the budget right now. To help preserve the wood and make it look more attractive, I apply a stain to the wood once a year in the spring.
We like Thompson's Water Seal in Honey Gold. I am a fan of this stain for three reasons: its inexpensive, you can pick it up off the shelf at your local home improvement store and it is really east to apply.
Because I only do this chore once a year and its not easy stuff to clean up, I make a stain holder out of an empty water jug. It has a sturdy handle so it is easy to carry and hold and is readily available in our house since we buy our water. It also easy to dip and wipe the access the stain off the brush. I also use these for paint holders around the house.
I simply cut a hole along the smooth plastic of the jug keeping the handle intact. Dispose of the cut portion and fill the container with stain. When finished staining, I toss the brush and container in the trash.
So, after the beds are weeded and fresh mulch is applied, I bring out the stain and apply it liberally to the wood with an inexpensive stain brush.
Here are a few before and after images of the wooden garden perimeters.
before
after
before
after
before
after
There is certainly a bit of sweat involved in applying the stain since we have 10 beds now and counting, but I appreciate the peace of mind knowing that the wood is protected for another year, and its one more item we can mark off our to do list!
Have you been staining any wood around your home lately?
Subscribe to:
Posts (Atom)